DIY – How to Fix a Leaking Faucet

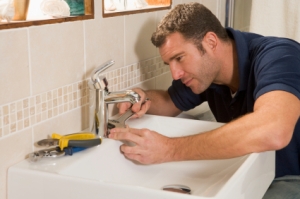
In addition to being aggravating in general, leaking faucets make water bills go through the roof. With that in mind, it’s smart to take care of the problem right away. There are many places where a faucet can leak, and a leak at the handle can be especially perplexing. Despite turning the handle as far as possible, a small, steady trickle of water may drip out into the sink. When the faucet is on, the leak may turn into a small stream that gets onto counters and causes a mess. The good news is that repairing a faucet that’s leaking at its handle is fairly simple. Just follow the directions below.

What You’ll Need
Until you take apart the handle, you won’t be able to tell what is specifically causing the leak. Fortunately, it’s probably just one of two possible things: A damaged handle cartridge or a corroded, cracked O-ring. Neither part is especially expensive, so you might as well replace them both while you’re at it. The local big-box home improvement store is sure to have both pieces, and you can probably find them at smaller hardware stores as well.

In addition to buying O-rings and a handle cartridge, you will need the following tools:

  • Wire brush
  • Mini screwdriver
  • Allen wrench set
  • Flathead screwdriver
  • Sharp knife
  • Wrench
  • Non-toxic, heatproof plumber’s grease
  • Calcium solvent


istock_000008887319_extrasmall

1) Turn Off the Water
Any time you work on a sink, the first step is to turn off the water. The last thing you need is to be sprayed in the face after pulling off the handle.

  1. Look beneath the sink. There should be two valves located at the back or side of the cabinet.
  2. Turn each valve all the way to the left. You may have to use a wrench. Don’t use excessive force because it could damage the valve and force you to run out and buy a new one.
  3. Close or cover the drain to keep screws and other hardware from dropping in and getting lost.

2) Remove the Handle
The only way to repair a leaking faucet handle is by removing it. Follow these steps to do so.

  1. Take a minute to examine the handle and faucet. The specific steps that you’ll need to take will depend on how it is designed.
  2. If you have an older faucet, you should be able to simply twist off the handle or handles. Turn the handle as you would when turning it on. When it reaches what seems to be the farthest point, apply a little extra pressure and keep turning. It should push past that point. From there, keep turning it until it twists off completely.
  3. To remove the handle on a newer faucet, look for the brand logo near its base. You should be able to pry it off with a flathead screwdriver. Once it’s removed, you will see a tiny hole. Insert the Allen wrench or mini screwdriver into the hole and twist it to the left. At this point, you should be able to remove the handle.

3) Fix the Handle
Now that you’ve removed the handle, you can really get down to business. Keep in mind that the following steps are simply a guide. The assembly of your faucet and handle may differ slightly. You might want to snap photos as you work so that you can put it all together again easily.

  1. If you have a newer faucet, you will see a shroud. Twist it to the left to remove it.
  2. You should now see a small adapter that’s secured by a screw. Using a wrench to hold the assembly in place, remove the screw. The adapter should pull off with ease.
  3. Remove the small plastic cover that you’ll see after removing the adapter.
  4. There will be another, larger plastic cover. To remove it, twist it to the left with a wrench.
  5. To remove the small clip, just pry it off with a flathead screwdriver.
  6. Using the wrench, pull up on the stem of the faucet. This will allow you to access the spacer, which you should remove. At this point, you should be able to pull the stem off all the way.
  7. Use a wire brush and calcium solvent to remove any buildup. If it’s not removed, it could keep causing problems in the future.
  8. Remove the O-ring or O-rings and replace them with the new ones.
  9. Put in the new handle cartridge.

4) Rebuild the Faucet Handle
To rebuild the faucet handle, just follow the same steps you did before but do them in reverse. This is where the photos you took earlier will come in handy. Take your time while rebuilding the handle. Securely fasten all of the hardware and wipe everything down to ensure that it is dry and free of debris.

5) Test the Faucet
After everything is in place, turn the water back on by turning the valves beneath the sink. Look closely for signs of a leak. Turn the handle or handles and check to see if water leaks from them when the water is on. If not, you are good to go.

DIY – How to Install a Tile Kitchen Backsplash

A new backsplash in your kitchen can do wonders for the room. Not only will it improve the appearance of your kitchen, but it will also serve to protect your walls and make cleanups easier.

Although you may need professional skills to install a wood, granite or stainless steel backsplash, ceramic or glass tile is relatively easy for even an inexperienced do-it-yourselfer to install.

You will need the following supplies:
· Tape measure
· Tile
· Tile adhesive or mastic
· Tile nippers
· Tile cutter or scriber
· Tile spacers, unless you use self-spacing tile
· Notched trowel
· Grout, either powdered or premixed
· Grout float
· Sponges
· Level
· Pencil
· Grout sealer
· Silicone

1. Get Ready for the Project
Measure the area you want to cover with tile. Multiply the length times the width of the space to determine the number of square feet involved in the project. Check the label on the box to find out how many square feet each box of tile will cover. Purchase 15 percent more tile than your calculations indicate you need to ensure that you have enough to repair mistakes or damage that may occur later. Keep the leftover tile after completing the job, and if possible, store a few pieces where they will have exposure to light similar to that in your kitchen. In that way, you can make a repair several years later if needed, and the repair will match the tile already on your wall. Protect your countertop with a layer of heavy cardboard before beginning your project.

2. Prepare the Surface
If there are electrical switches or outlets in the area, turn off their circuit breakers and remove the switch plates and outlet covers. Remove wallpaper from papered areas, scrape flaking or cracked paint and gently sand glossy paint on painted areas. Scrub and rinse the area thoroughly and let it dry completely.

3. Mark Guidelines
Mark the approximate center of your backsplash area with a pencil. Make a vertical line a few inches to the left or right of the center, from the top to the bottom of the area you will cover. Use a level to ensure that you make the line exactly vertical and straight.

4. Apply Mastic or Adhesive
Spread the tile mastic or adhesive on the wall with a notched trowel held at a 45-degree angle. Cover areas just large enough for about four tiles at a time.

5. Set the Tile
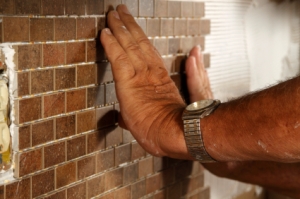
Leave a 1/8-inch gap between your countertop and the bottom of the tile, and set your first tile on the vertical line you made. Twist each tile slightly as you set it, pressing it firmly into place. Unless your tile has self-spacers to ensure uniformity of spacing between tiles, place tile spacers snugly alongside the set tiles. Set the spacers by standing them on end to make then easier to remove before grouting the area. Continue setting tile out from the beginning point, spreading more mastic or adhesive on small areas as you go. Clean the tile surface often to remove any adhesive while it is still wet.

istock_000007759551_extrasmall1
6. Cut the Tile
Cut the tile to fit around corners and electrical outlets with a tile scriber, cutter or nippers.

A handheld scriber scores the tile so you can snap it on the edge of a straight surface to break the tile evenly. However, it can be difficult to make even breaks without damaging the tile unless you have had practice using the tool.

A tabletop tile cutter holds the tile firmly as you pull a cutter along a guide.

Use nippers to cut odd shapes by slowly and carefully nipping small bites out of the tile until you get the desired shape.

After cutting the tile, smooth cut edges with 60-grit sandpaper or a rubbing stone.

7. Let the Adhesive Dry
Allow plenty of time for the backsplash to dry according to the package instructions.

8. Apply Grouting
If you used spacers when setting the tile, remove them before applying the grout. Wear rubber gloves to work with grout because it is caustic. Refer to the manufacturer’s instructions to mix the grout unless you have the premixed variety. Hold a float at a 45-degree angle to spread grout on the tiled surface, working the grout into every space. You will get the best coverage by working diagonally to the grout lines. As you work, keep the surface of the tile as clean as possible.

9. Clean the Backsplash
Use a damp sponge to wipe the surface, and use your fingertip in a glove to clean the grout lines as soon as the grout feels firm. Waiting too long will make it difficult to remove the grout from the tile surface. Wipe the area again with a damp sponge. After the tile dries and appears hazy, use a clean cotton T-shirt or other soft rag to buff the tile vigorously.

10. Seal the Grout
Apply grout sealer from an aerosol can according to the directions on the can. The sealer will protect the color as well as prevent moisture from getting into the grout.

11. Fill Gaps
After the entire area is dry, run a generous bead of mildew-resistant silicone caulk all along the perimeter of the tiled area, smoothing it with your wet fingertip as you go. Remember to fill in the gap between your countertop and the bottom row of tiles.

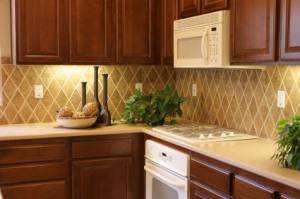
When complete, your new tile backsplash should look something like this:

istock_000002981369_extrasmall1

Three Unique Kitchen Cabinet Looks for a Contemporary Kitchen

Whether you are designing the kitchen for your new home or remodeling an outdated kitchen to accomplish a more contemporary look, you will want cabinets that not only bring the whole space together, but give your kitchen a unique style all its own. Some of the more modern materials used in making contemporary cabinets include glass, exotic woods, and stainless steel. While there are dozens of contemporary design schemes to choose from, here are three unique kitchen cabinet looks you may be interested in when considering your contemporary kitchen design.

Black, White and a Splash of Color

Black and white has always been at the forefront of the classic kitchen design, but now it is coming into its own as a wonderful combination color palette for contemporary kitchen cabinets. Try installing glossy white kitchen cabinets and pairing them with black marble or granite countertops. Once you have the basic cabinetry down, you can choose one or two colorful accessories, such as fire-red pendant lighting above the black and white island/bar seating area or a vivid color tile for the kitchen backsplash. The cabinets in this design should be sleek and tall with little or no adornment on the doors to give the area a clean, industrial look. This design is perfect for smaller kitchens because the slim, light design can make the space appear larger.

Smooth as Glass

The open cabinet design is used when you have an eclectic mix of beautiful dinner and glassware you intend to showcase, but the openness of the design doesn’t quite fit within a contemporary kitchen where everything must appear in order. To be able to display your wares without giving your kitchen a farmhouse look, you might want to consider using glass inserts in your cabinets. Glass can be used many ways. It can be etched, fluted, or frosted to obscure the contents behind.

Dark wood such as mahogany turns any kitchen into a contemporary masterpiece. The glass inserts fit nicely into this type of cabinet. Stainless steel cabinets, by themselves, can appear too stark for some modern kitchens, but if you use glass inserts, such as the fluted type, it can transform your kitchen into a most inviting modern space.

Contemporary Glass Kitchen Cabinets

The New Green

One of the best ways you can do your part to save the environment is to consider using green materials in your contemporary kitchen cabinet design. Thinking outside the box will enable you to create a unique-looking kitchen starting with the cabinets. Renewable materials such as bamboo/plywood and lyptus, taken from a hybrid of the eucalyptus tree, are not only as sturdy as traditional hardwoods, but they are extremely beautiful woods that fit perfectly within the contemporary design scheme. In addition to their unique appeal, cabinets fashioned from green materials also offer additional health benefits by emitting less chemicals into your environment than those made from traditional cabinet materials.

Whichever contemporary cabinet design you choose, be sure that it fits within your overall modern design scheme. A qualified interior design expert can help you decide which materials and colors to choose to accomplish a unique look that you and your family can enjoy for many years to come


Kitchen Countertop Material Choices, Alternatives to Granite

The kitchen is the heart of your home and its appearance impacts the atmosphere of the other rooms around it. A kitchen that’s old and looks out-of-date can benefit from simple maintenance and renovation. One way in which to improve your kitchen’s look and functionality is with new kitchen countertop installation or replacement. With a variety of countertop materials to choose from other than granite, you can select one that complements the rest of your kitchen or changes its look altogether. Here are a few popular kitchen countertop ideas that might work for you.

Butcher Block
If you enjoy cooking, a butcher block counter can add to the convenience in your kitchen. A food prep area will always be ready for you with this style of countertop. Butcher block or wood countertops add a rustic touch to your kitchen. They’re easy to clean and care for, requiring period resealing to prevent water damage and stain penetration.

Natural Stone
Natural stone such as granite or soapstone creates classic appeal when used as your kitchen countertop surface. Soapstone is dark gray in color and found in both modern and historic homes. Naturally stain resistant, soapstone is often used for sinks too. The natural color variations found in granite make it a material that complements most any kitchen color scheme. Rated as the second hardest surface after diamonds, granite is a durable countertop surface that’s highly valued by home buyers.

Corian
Corian is a type of solid surface countertop. It’s made to the specifications of your kitchen and typically installed in one large piece. This seamless countertop material resists stains, which makes for easier cleaning. You can have a solid surface countertop made in most any color or pattern you desire. Scratches can easily be sanded out of the surface of Corian to keep it looking like-new.

Laminate
Laminate countertops are plastic-coated and cut to fit the measurements of your kitchen. This durable countertop can be made with a variety of colors and textures to complement your existing kitchen decor. Laminates are less expensive than many other types of countertops, making them an affordable option for home renovators on a budget. With laminates it’s important to be careful since it can be difficult to fix chips or cracks.

Ceramic Tile
Another inexpensive countertop choice is ceramic tile. This easily cleaned and maintained surface comes in a variety of textures, designs and colors. The ceramic tile you choose can become the focal point of your renovated kitchen or you can use it as a subtle complement to the current decor. Ceramic tile holds up well to use and when cared for properly can last for many years. This type of countertop surface goes well with most every decor.

The countertop you choose for your kitchen will be with you for many years to come. Consider your needs to help you choose the type of counter material that bests suits you in both appearance and function. Any of these popular kitchen countertop styles are certain to add to the beauty and value of your home.